Merry Christmas from Melinda and Jan and our families!


Merry Christmas from Melinda and Jan and our families!
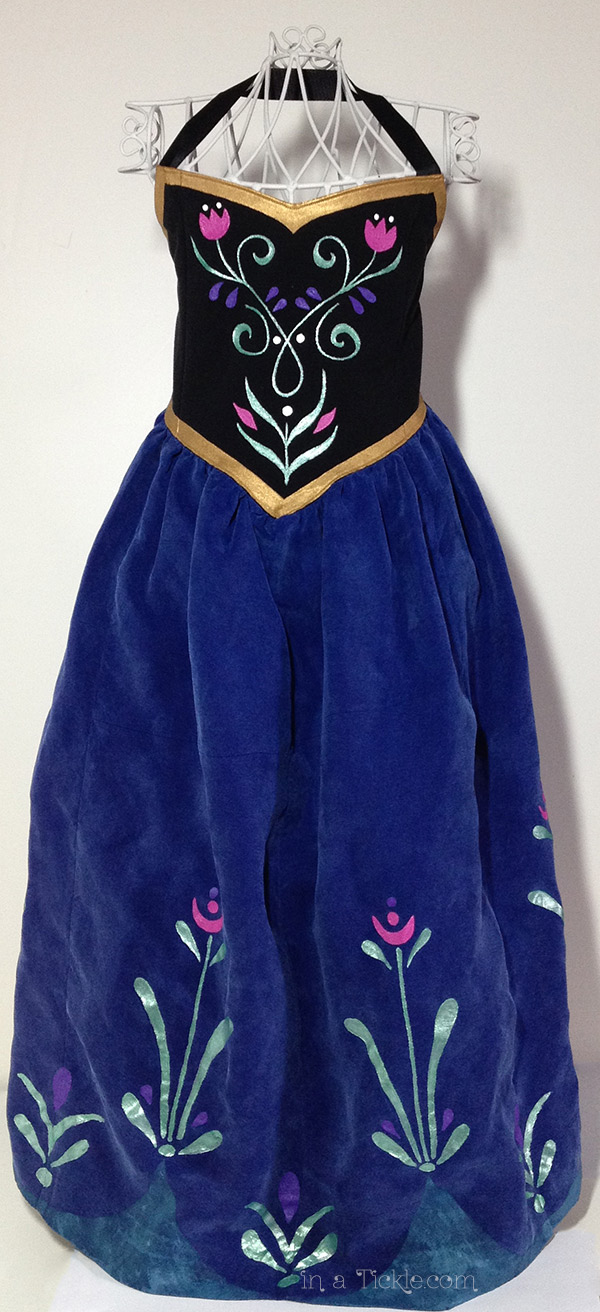
After several very late nights, the dress-up apron for the Snow Queen’s little sister, Anna, is finished just in time for Christmas. In case you missed it, here is the link to the dress-up apron for Elsa. I made the apron for Anna with a slightly different shaped bodice in black fabric (cut from the back of a shirt) and a gathered skirt (bottom of a formal dress from thrift shop) sewn together. The arm openings and the ribbon neck and ties were done in the same way as the Elsa apron.

I could not find gold ribbon for the bodice, so I bought a metallic paint for fabric and painted the gold trim. For the design on the front of the bodice, I freehand drew the basic lines with a disappearing ink marking pen for guides. Then I painted with fabric paints. I used the same procedure with the flower designs on the skirt.

To make the scallop shapes at the bottom of the skirt, I cut half circle shapes from cardstock, laid them in place and sponge painted around the edge.


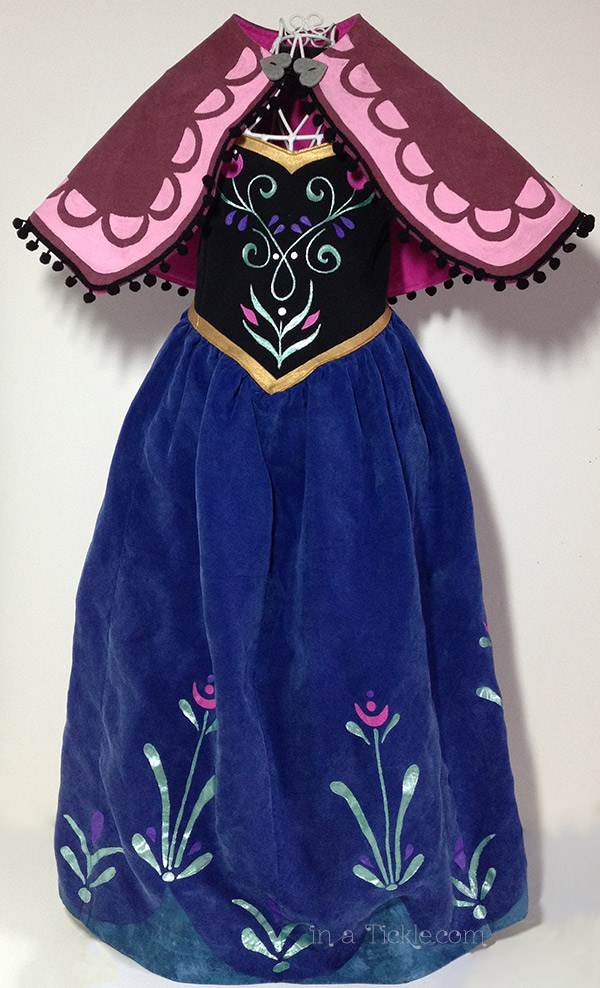
My granddaughters are willing to pretend that a blanket wrapped around their shoulders is an Anna shawl, but I decided to make a cloak to go with the dress-up apron. I used some lightweight denim corduroy lined with flannel for the cloak. Pom-pom trim was stitched along the outer edge. I used cardstock to cut a stencil guide to paint a lacy looking trim in light pink fabric paint around the cloak. I used a brush instead of a sponge because the ridges in the fabric were harder to fill in. For the clasps, I made heart shaped buttons from polymer clay and sewed an elastic loop under one button to hook over the other button.

I can’t wait to see the girls playing with their dress-up aprons. Melinda is pretty sure that it will be awhile before she can sing “for the first time in forever the girls don’t have their dress-up clothes on!”
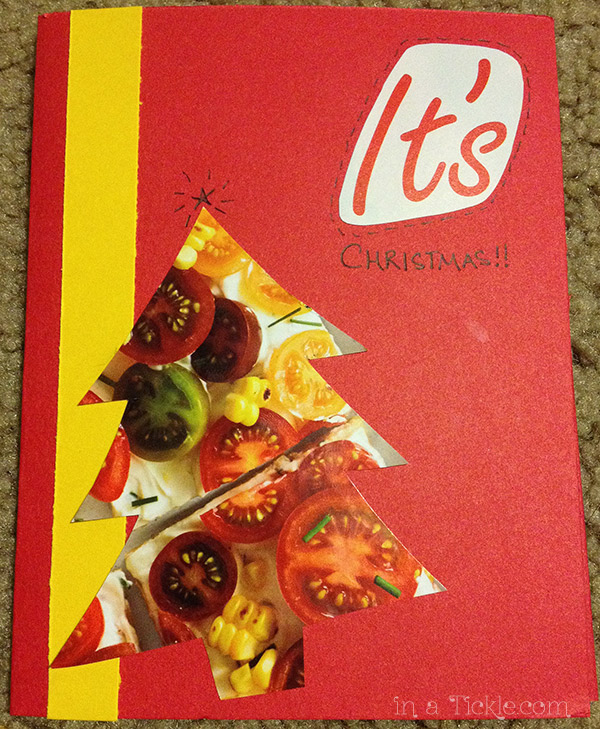
Christmas is 2 days away! Do you have any last-minute things you need to get done? I did! I wanted to make some cards for some family members for Christmas. If you have any magazines laying around, you can make some easily too.
I thought I would share my process in case you don’t know where to start.
1. Gather supplies.
-You need at least one magazine, a pair of scissors, glue, and cardstock.


For making Christmas cards, the Holiday editions of decor magazines are the best, but any magazine will work.
2. Look through the magazine and cut out any words, phrases, or pictures that stand out to you.
I cut out everything that I like, regardless of if I am going to use it right away. I can save it for another time to make cards.

3. Choose what you are going to do for your card.
It’s easy to choose things to put together when you have it all laid out in front of you.


4. Take a second look through the magazine to find any words you are missing.
I needed an “AND” so I looked back through the pages to find one. It’s amazing what else pops out at you with another look through the magazine.

I needed a “?,” “WANT,” and “DO” for my other card.

5. Design and glue it!


I like to find bigger pictures to use as my background then add the words for what I want to say on the front.
More cards:


Yesterday I shared with you the dress-up aprons I made for the granddaughters to play Elsa, the Snow Queen from the movie Frozen. I decided they also needed some accessories for their outfits.
First of all, I tried making gloves. I’ve never made gloves before and have decided glove making is not for the faint of heart. It is definitely an art. There were even guilds dedicated to the art of glove making in the middle ages. For an interesting history of gloves read about the styles and significance of gloves here and read about the customs and symbolism of gloves here. There are even special glove sewing machines available now.
For my glove making adventure, I chose to cut up a cotton t-shirt. I drew a hand shape, cut out the pieces and tried to sew them together with a very small seam. I tried several of the presser feet that go with my machine and found that the fabric would not feed through the machine very well to sew such a close seam. I still have not learned what all the feet can do. I’m not sure that the one that I finally used was for this purpose, but it worked, and that’s what counts. I used my edger presser foot with the needle set to the left side and sewed a 1/8″ seam.

The gloves look kind of strange and I am not sure the girl’s hands will fit in them, but we will soon find out.

Then I tried to make gloves the “real” way with gussets. This is the pattern I used. I ended up sewing most of the finger area by hand because it seemed too complicated trying to use the machine. These might fit the youngest girl’s hands. I added some design on the back of the gloves with slick fabric paint.

So if neither of these gloves will fit the girls, I sprayed a pair of white gloves (that I already had) with turquoise fabric ink to make them look somewhat frosty. I have another backup pair that can be sprayed if need be for another pair.

My conclusion in trying to make gloves is that I don’t plan on going into the glove making business! But I tried.
The other accessories I made were white hair braids from yarn which I sewed to a hair comb. I wove some fancy ribbon through each braid to give a little sparkle.


And of course, Elsa needs a snowflake necklace to wear, so I made some with polymer clay.

I can’t wait to see the girls’ response to the dress-up outfits. Usually when I am sewing something, I am trying things on them as I go. Now I have to wait!
If you have a little girl in your life, chances are she loves a certain queen who sings a certain captivating song, and once it is heard, the brain just won’t let it go. I have three little granddaughters who role play Frozen at least once a day and would watch the movie every day if they were allowed. Even though the song gets stuck in my head, I love watching them sing with so much emotion while play-acting the role of Elsa. It seems they can’t go up a flight of stairs without bursting into song! So I decided to make some dreams come true and sew dress-up costumes for them for Christmas.
Melinda had a bridesmaid’s dress from several years ago hanging in the closet that was the perfect color. She wasn’t planning to wear it again and knowing the girls would LOVE it, gave me permission to transform it.

I removed the zipper in the back and opened the seam to the hem. I made a horizontal cut across the dress between the waist and bust line. Since there were eight panels in the skirt, I also opened the seam down the front of the dress to the hem. Then I had two pieces of skirt for making two dress-up aprons. I folded the skirt panels in half lengthwise and made an angle cut from the top edge to the side to fit under the arms. Then I folded the top of the bodice of the apron under 1/4 inch twice and top stitched. Each side of the apron skirt was also folded under twice (up to the arm opening) and top stitched. To make a casing for ribbon ties, I sewed wide seam binding to the arm opening (right sides together) and folded the seam binding to the back side and top stitched it into place, leaving openings at the top and bottom edges of the seam binding for a casing.

Seam binding casing for ribbon ties at arm opening.
I found some crocheted snowflake ornaments made by my grandmother that had never been starched to make them stiff for hanging. They had been embellished with sequins and beads and were perfect to sew onto the front of the apron bodices.

I threaded a fancy ribbon up through one arm casing and down through the other arm casing to form the neck of the apron and the waist ties. I wanted the apron to be one size fits all, so this makes it easy to adjust.


To help keep the ends of the ribbons from pulling through the casing, I sewed some fancy “ice crystals” pompoms that I just happen to have in my stash, to each end.

The apron looked beautiful, but I had a snowflake stencil I purchased last spring that was begging to be used. So I stenciled snowflakes onto the skirt using white fabric paint. Depending on how the light hits the fabric you can see the snowflakes well or hardly at all– makes them feel more magical.


I can’t wait to see these on the girls. Next post I’ll show you some accessories I made to go with the aprons. Now to work on the Anna Apron! Shh…don’t tell the girls!

Over the years we have accumulated many crayons, and over time, they inevitably get broken. As I am sure you know, it is way more fun to color with fresh new crayons than broken ones. So these poor lonely crayons accumulate and settle to the bottom of the box passed over in favor of their sleek, full-sized brethren. A couple months ago, the crayons got sorted so the broken ones had their own box that I kept up on the shelf for a someday later project. Someday finally arrived! I allowed/made my girls help me tear the paper off so they could be chopped up.
 I have always thought it would be cool to make crayons into new ones by melting them together in the oven. We put the crayon chunks into paper liners in the muffin tin. (I also had some foil liners and highly recommend those over the paper ones. They come out easier and they have a pretty shiny look.)
In the oven at 250 degrees for about 15 minutes. They don’t come out looking too pretty sometimes….


Until you take them out of the liners!


I love the way they turned out! You can do all kinds of color combinations to make them interesting. I like how the paper and foil liners make them look like bottle caps. I packaged them up to give as gifts for Christmas.

I am definitely not the first to melt down crayons, so if you want to see more ideas check out Pinterest or google.
Before the first pan had cooled, I wanted to try painting with the melted crayon. I found a canvas that My Princess had painted a lovely shade of Toddler gray a few years ago. I used an old kids watercolor set paintbrush and dipped it into the wax while it was still hot. It worked pretty well until the crayons started to cool (started painting the blue flower and ended with the red). I think it turned out kind of cool!

I pulled out a book for my kids that we got a long time ago but hadn’t looked at much. The books is The Usborne Book of Famous Artists. I thought we could read about an artist then do some art. The first artist in the book is Giotto Di Bondone. You may or may not have heard of him. He lived almost 700 years ago. He painted mostly religious works and mostly on walls of churches. When we looked up some more information about him online, we learned that he did several versions of the nativity.

No.18 Scenes from the Life of Christ–Adoration of the Magi
I had the kids each paint their own version of the nativity.

“The Big Light” by Ninja Boy

“Family” by My Princess

“Paint” by Miss Tickles
While they were painting, I realized that I wanted to paint too! I don’t usually do much with paint. I haven’t ventured into that medium very often other than the gelli plate. As I sat down and started painting, the kids were fascinated with my use of the paint brush. They were used to using the paintbrush much like you would a pencil or marker. I swirled the brush around with wispy movements, and they decided they wanted to try that too! Ninja Boy did a few strokes on my page then let me finish it. They decided I should make a snowy scene rather than a Nativity.

“Winter Birds” by Melinda
I also talked to them about how you can add layers to your painting by doing a background first then allowing the paint to dry before you add more on top. My Princess tried that with her next painting (we cheated a little and used a hair dryer to speed the process up a little).

If you have kids, try sitting down to paint with them next time. You can learn something and maybe they can too. If you don’t have kids, maybe you should try painting anyway! You don’t have to get anything fancy, just practice with a brush, paint, and a piece of paper.
For week 49 of the Documented Life Project, the art challenge was to : “Trace a hand onto your page.”
Jan:
I used my hand as the “stamp” to remove paint from my homemade gelli plate before pulling the print. I love how the lines in my skin show up in the paint. I made many prints trying various techniques and color layer combinations before coming up with this one. Some of the prints I was making seemed to be heading in the right direction until I took them one step too far and lost the effect I was going for, but that is the fun of gelli printing– experimenting. And every print is totally unique and unrepeatable.

Melinda:
I had been looking at Pinterest for another project and came across a pin that suggested literally making a copy of your baby’s hand. I loved the idea and wanted to do it with Baby Boy as a way to remember his sweet, tiny hand. I held his hand on the copy machine, and he looked at me like, “what are we doing?”
Since this week was trace a hand, I felt that this was a perfect way to use my keepsake. I love those baby fingers.

My grandkids always want to try what they see us creating and the results of our clay adventures looked enticing to them. Since the polymer clay requires hand strength to condition it (make it softer) I was not sure they would be able to work with it yet. I came across this recipe for making clay from Argo cornstarch and we gave it a try.

The recipe says to add food coloring with all of the other ingredients, but I had very little food coloring. So I waited until the clay was cooked and slightly cooled, then divided the batch and colored a couple of balls of clay with food coloring by kneading it into the clay. I gave them some tools and the kids had a great time playing with the clay and trying to make things with it.


While they played I watched the video that came with the recipe– there is a big green button right under the “Directions” header that says “Watch Video” but I somehow missed it! I realized after watching the video that I had cooked the clay for too long. The clay seemed drier than it should have been and of course when most of the creations they had made dried, they were cracked (you don’t have to bake this clay to harden, just let it air dry.)

Overcooked clay will dry with cracks.
So on another day, we made a new batch of clay. This time we did it right without overcooking it. I also left it white so they could try painting it after it dried. The kids could tell that this batch was much easier to work with and held its shape better while they were creating.


When this batch of clay creations dried, there were no cracks.

Now it was time to paint and they seriously enjoyed painting every piece.

They stuck their beads into toothpicks to make it easier to hold for painting and the toothpicks were stuck into holes in a box for drying.

After the paint dried the girls wanted to string necklaces with their beads and were so proud of their work.


Make a batch of clay for your kids and let them create. Or just let them play with the clay without making a final “product”. My Songbird does not like the texture of play dough, but while visiting her I made a batch of Argo clay to see if she would like it. She likes it and her little people like it too!

We have one more crafter to share with you from our visit to the Harvest Festival. As we wandered around the booths at Silver Dollar City, some beautiful and unique rugs caught our attention.
This particular one was 65 years old, well used, and still in great shape!

Laura White demonstrated a rug making technique called Pleache’t (pronounced to rhyme with crochet- technique combines pleats with crochet) using a needle developed in the early 1900’s by her grandmother, Laura Elizabeth Johnston. Her grandmother sold the needles at fairs. She even created wall to wall “carpeting” in her living room, dining room, hallway and stairs with her rug making technique. Laura White’s late sister, Shirley Wood, introduced this rug making technique to the craft world, and now Laura is carrying on the family tradition by teaching others how to Pleache’t.


The rugs are made by first cutting strips of wool or wool blends and cotton on the bias. The width of the strips determines the thickness of the finished rug. Laura finds old garments at thrift stores, yard sales, estate sales, and occasional fabric store from which to cut her strips. She recycles old material into new heirloom rugs. The Rugbee Rug Needle is pointed on one end and has a crochet hook on the other. The strips are looped back and forth onto the pointed end of the needle. Using a string called carpet warp (which is what weavers use on a loom) she joins the strips together with crochet stitches. There is no sewing involved in making these rugs.

The color design of the finished rug is determined by the cut edges of the wool strips, not the actual pattern of the fabric surface. She says that sometimes the ugliest fabric makes the prettiest rugs. Rugs can be made in round, oval or rectangle shapes. If you want to start small, you can make soft chair pads. The rugs last a long time even with lots of use. “The more you use them the prettier they get.” (Shirley Wood)

Laura sells the Rugbee Rug Needles along with an instructional video and book. You can even have her come teach a class on rug making to your group. She is scheduling classes now for 2015. You can contact her for more information at her Facebook page, Rugbee Rugneedle. Doesn’t making a rug sound like a great winter project as you cozy up next to the fire with a cup of coffee?
UPDATE: July 2016- Laura now has a website from which you can order materials and instructions: pleachet.com